
How to style wigs with rollers
In Part One of our Pictorial Guide to Rollers, I showed you how different sizes of rollers affect the size and shape of the hair and what happens when you use different directions of roll. In Part Two, I’m going to show you the basics of good (and bad!) roller technique – how to correctly wrap the hair, what kind of products to use and how to attach the things to your hair or wig.
While I am using a lace front, human hair wig for demonstration, the techniques are pretty universal to all rollers and most wigs. You can even use some of these techniques to roll your own hair.
Set up your wig styling area
I really can’t emphasize enough how important it is to have a clean work surface with decent light for wig styling.
You should also have a large mirror in front of you while you work. It’s essential for letting you see what the wig is doing and how the style is shaping up from front and back.
Wig styling supplies
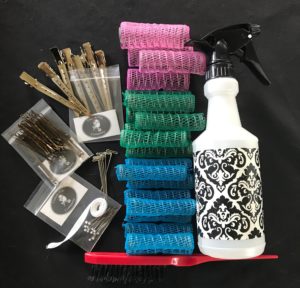
In addition to the hair, you’re going to need a spray bottle of water and one of styling gel. You’ll also need rollers of the correct size (see Part 1 for choosing the right rollers). Be sure you have a comb or brush with a long ‘tail’ for sectioning the wig hair and a wide-tooth comb for combing it out later.
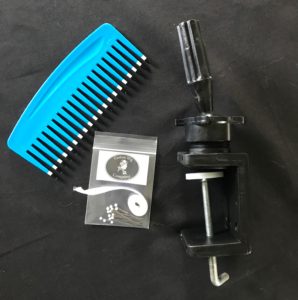
You’ll find rolling a wig much easier if you have a clamp for the wig, as that will keep the wig head in place while you work on it.
Essential Wig Styling Supplies
everything you need to style, wear and care for your wigs
Set up your wig for styling
It’s best to do all your wig styling on a sturdy canvas block. The block should be the same size as the wig or slightly smaller. Canvas blocks are ideal for styling because they’re closer in size and shape to an actual head. Their weight keeps them from constantly popping off the clamp. While they are a bit of an investment up front, you’ll find they are incredibly durable. One block will likely last your for years of heavy use.
If the wig has a lace front, block the lace down carefully to protect and stabilize it.
Prepare the wig hair
Hair is easier to roll when it’s damp. Dampening the hair also makes the set take better, giving you a better result.
A plastic spray bottle is great for dampening hair and distributing your styling product evenly. It’s not necessary to soak or saturate the hair, just dampen it slightly.
Start with a clean, dry wig and mist each section as you roll. Spray the section first with plain water, then with a little styling spray.
If you need to re-wet a section while you’re rolling, just use the plain water since you already have styling product on the hair.
What styling spray do you use for rolling wigs?
Styling spray is simply very diluted gel. Diluting gel with water and alcohol makes it easier to lightly coat the entire strand of hair with gel, without gunky buildup. You only need a small amount of the styling spray – the heat and evaporation are what really sets a style.
- For human hair wigs: use a mix of 2 parts water and 1 part rubbing alcohol with a tablespoon or so of gel.
- For synthetic hair wigs, steam is actually the thing that sets the style. Use a bit of plain water the make rolling the hair more manageable.
Handy Tip – if you’re re-rolling a wig that has become messy or just needs some tlc, you probably don’t need to wash and start from scratch. Often, you can maintain a style by simply dampening with plain water (it will reactivate the styling gel already in the hair!) and re-rolling it.
One last thing about styling product – too much is worse than none. With roller sets, the product isn’t the star player, the process of moisture and evaporation is. The product will help the hair hold the set, but it’s better to use good roller technique and allow for the set to dry completely than to rely only on gel or spray.
What kind of rollers should you use with wigs?
Pick smooth rollers that are very firm and have an open mesh or weave to them. Sponge rollers aren’t great because they compress under the hair, compromising the set. Brush and velcro rollers or rollers with “teeth” on the outside will snag on the hair and make it hard to smoothly remove the roller. That causes flyaways and frizz before you even get started.
Pick a good comb
You’ll need a comb to smooth and detangle the hair, and something to help you section out the hair as you put it onto the rollers.
What kind of combs and brushes to use is very subjective and will vary depending on the situation and personal preference.
As with all things relating to hair-styling, trial and experimentation are the key to figuring out what will work best for you.
Having said that, you really can’t go wrong with a pointy-tailed styling brush or comb and a wide-toothed plastic or wooden comb. That’s what we use in the studio and that’s what we offer in our Wig Care and Roller kits. They get the job done very well without damaging the wigs.
So now you have your space, your products, your rollers and tools – what do you do with all of it? Here’s the next step to styling wigs with rollers.
I’m going to take you through the basics of good roller usage. Imperfect roller technique can really sabotage your efforts at wig styling.
Combine this with the information on how rollers manipulate hair from Part 1 and you’ll be all set to start using rollers to create hairstyles – which we cover in Part 3
How to Style Wigs with Rollers – what to do and not to do
Get Tense
The single most important factor in using rollers is putting the correct amount of tension on the hair as it’s wrapped on the curler. Failure to get the hair on there tautly will negate the rest of your hard work. This is vital to your roller set at the roots in particular. You need the hair wrapped snugly around the roller, and for the roller rest right up to the roots.
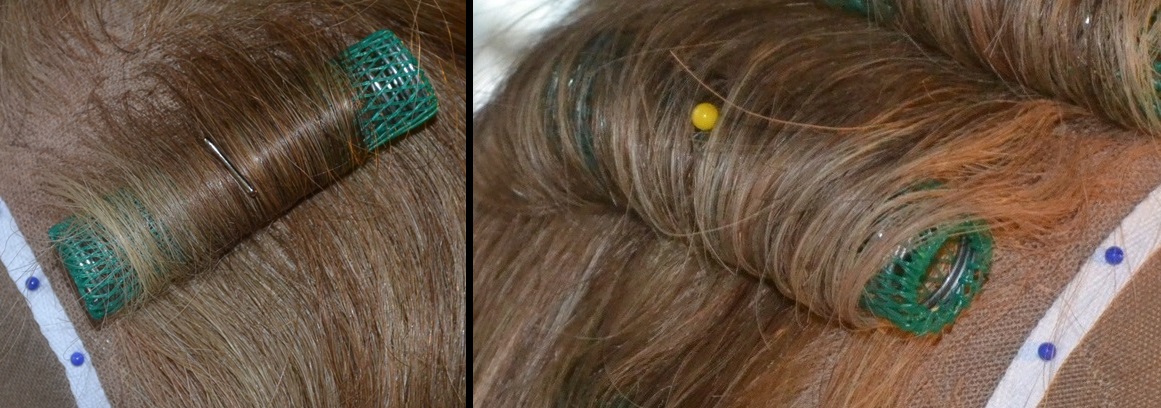
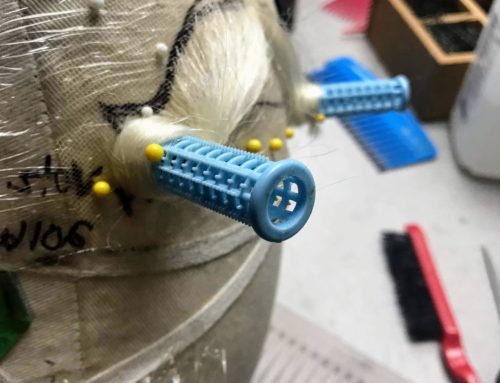
On the left, a roller with the correct tension. The hair is smooth on the roller and the roller is snug against the roots. On the right, the hair is too loose, the roller isn’t snug against the roots, and the overall wrapping is sloppy. That’s going to result in flop instead of lift at the root!
The right amount of tension is step one – but you’ll also want to ensure you’re not making these two common mistakes
Other critical roller techniques
Tension is key but there are a few other things to keep in mind as you’re putting rollers in your wig.
Don’t put too much hair on a roller
This is a common problem. You take too thick of a section of hair and wrap it around a single roller. The hair is too thick to dry completely and it’s hard to get enough tension to set the curl pattern in the hair.
Aim for sections of hair that are about 1/4″ thick. Thinner is fine, thicker is not.
Too large a chunk or section of hair prevents the hair from getting the right amount of tension, resulting in a loose, sloppy curl. It also takes longer to dry, so it’s both incorrect and inefficient.
In the photo on the right below, the top roller has the correct amount of hair on it. If you look at the photo, the top roller has a section of hair that allows for the roller to have maximum contact with the roots. There is both the right amount of hair and the right amount of tension.
The roller on the bottom in the photo has a much thicker section of hair wrapped around it -nearly an inch! You can see that the roller isn’t even close to most of the roots, meaning that the upper section of that piece of hair isn’t going to benefit from the roller at all!


Too much hair on the roller! In both photo examples, there’s simply too much hair. The roller will not have sufficient contact with the hair to shape it properly.
Don’t try to fit a wider section of hair on the roller
Ideally, the section of hair should be a little narrower than the width of the roller. You should be able to see both ends of the roller easily. If your section of hair is wider than the roller, the ends of the hair that stick out won’t benefit from rolling.
Sometimes this is really hard to avoid, especially in the lower section of the wig because you simply can’t fit enough rollers into the area. When that happens do your best to limit how much hair ‘spills’ off the end of the roller.
So what do you do if you need to roll a wider section of hair? The best course is to simply use two (or more) rollers side by side – but occasionally, there will be a large section of hair that needs to go onto a single curler (for example, turning under a gentleman’s queue for an 18th century wig). If that happens, tape two roller together, making one longer roller to allow all of the hair to have contact with the roller.
In short, if the hair isn’t touching the roller or wrapped around it, the roller won’t be able to change the texture or style of the hair – which will leave you with uneven, imprecise styles and sloppy outcomes.
One important caveat about rollers and tension
I’m going on about tension at the root and getting the roller as close to the root as possible. That’s because these are key features of a successful roller set. But the lower portions of the hair rely less on these tension and having the rolle close to the roots. So while I am using this photo to show off ineffective roller usage, know that the amount of hair and placement of roller two might be just fine for the lower part of a hairstyle, such as those from the 1930’s and 1940’s where you just want the hair to have some curl on the ends and the root is hidden.
A word about sectioning –
I’ve mentioned “sectioning” now repeatedly and shown how critical it is that you section off the right size and thickness of hair – but how do you do that? Remember our pointy ended brush? Use that point to lift up the hair you think you want to work with – you might have to adjust your initial picking and that’s fine.
While you can do this with your fingers or other tools, I find the pointy end of a comb or brush is the most effective – especially since you can immediately turn the brush around and smooth the section down before you roll it.

In the top photo, the brush’s pointy end allowed for a small section of hair to be picked up. You can then use the brush (or pointy tailed comb) to smooth out the section of hair. Once you have a nice, smooth section, maintain tension on the section of hair and wrap the ends neatly around the curler, as in the photo below. This will ensure you have a taut, smooth section of hair as you roll the hair up.

How to style wigs with rollers – keeping the rollers in place
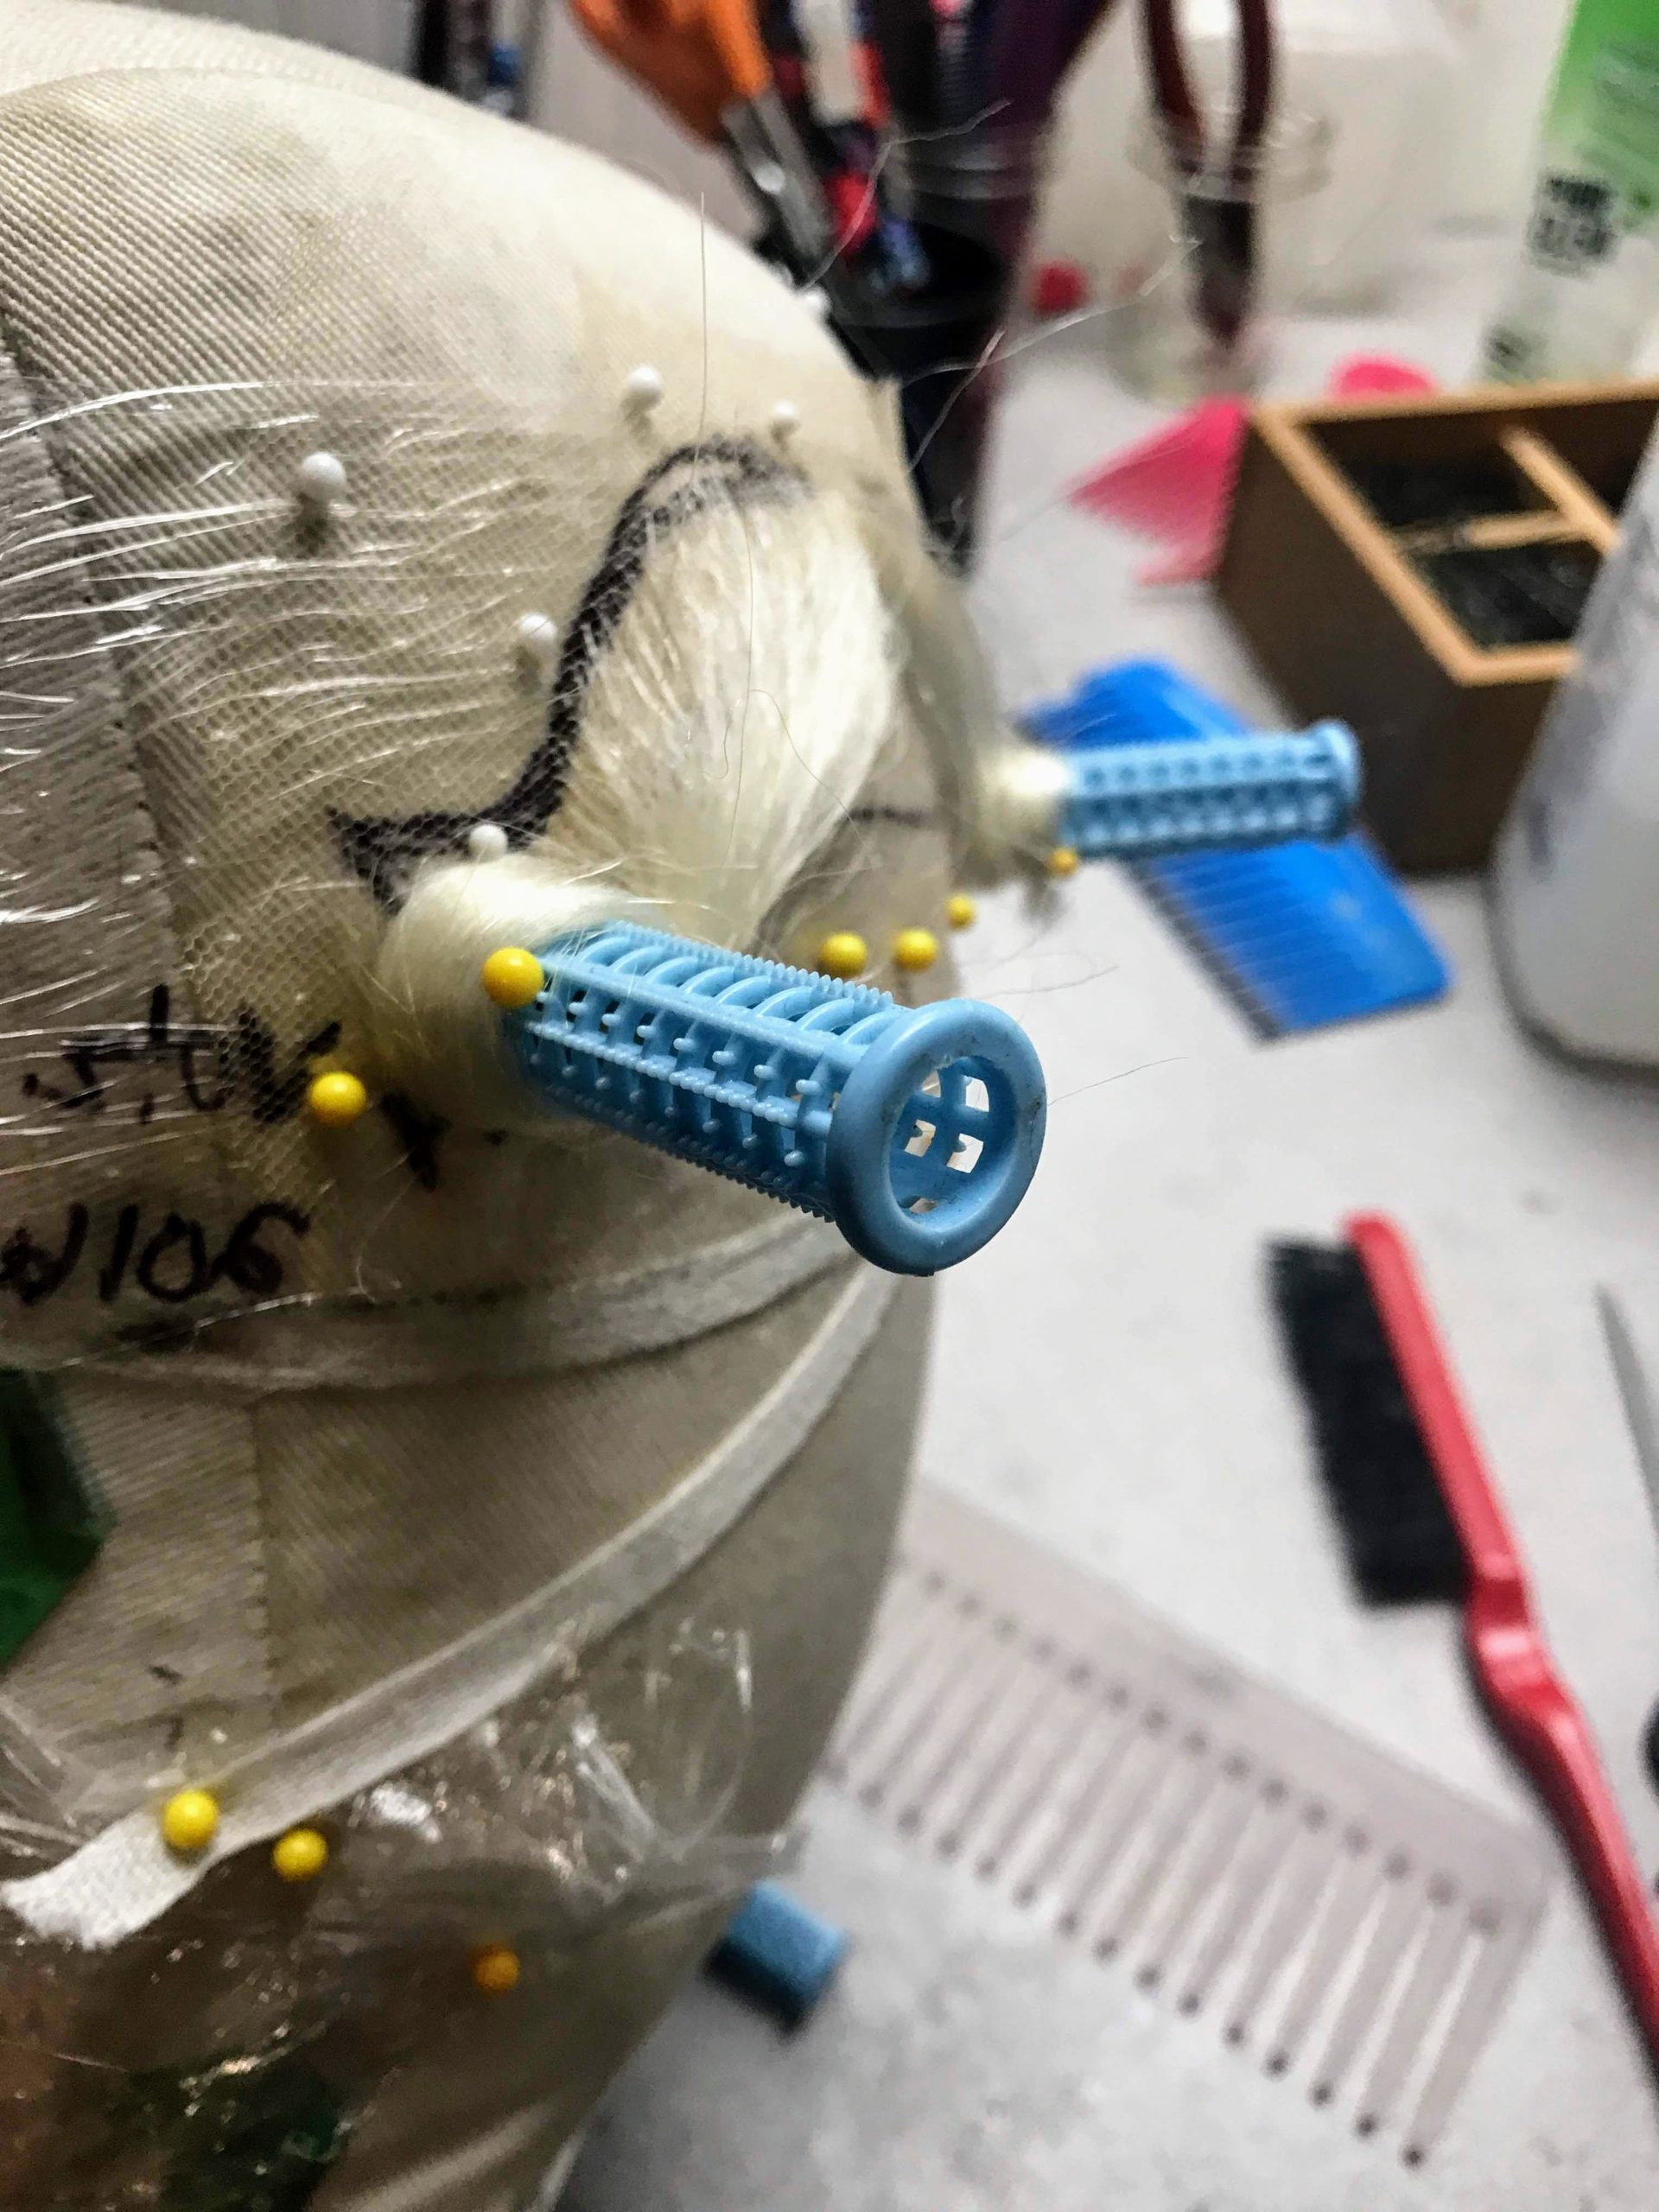
So I’ve covered some of the mechanics of putting hair onto rollers, but you might wondering how to get the rollers to stay put. Keeping rollers securely in your wig is why I recommend using open mesh rollers, as you can see below.
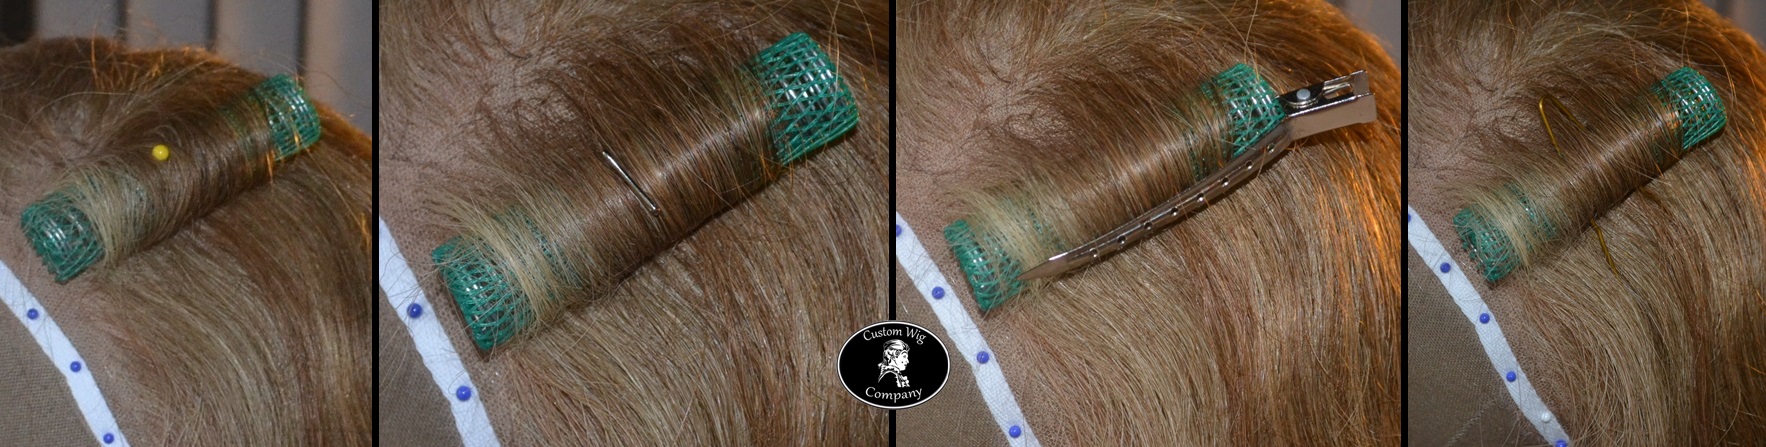
How to stick the roller onto (or into!) your head or wig
From the left, a simple sewing pin is stuck through the roller and into the canvas head. Second from the left is a similar approach, using a T-pin instead of a sewing pin. Both pins will stick through the roller and the hair into the head, but the thinner sewing pin makes it a better choice for delicate wigs. The T-pin is great for the sturdier back sections or machine made wigs that have thicker foundations.
For those not keen on pinning curlers you can use duck-bill roller clips.
These metal clips are perfect for holding a roller snugly in place. Be sure you put the clip towards the underside of the roller so you don’t get a crimp in the hair when you take it out.
You can click on the photo or the button link to order duckbill clips. We also include them with our Wig Styling Roller Kit.
Their length is key to holding the entire piece of hair snugly on the roller. They’re also useful for holding sections of hair out of the way while styling.

The fourth photo shows how to use a large hairpin to hold the rollers in place. Simply poke the hairpin through the roller and it will hold it in place – there are also “roller picks” available that perform the same function but I find hairpins to be more versatile.
Whatever method you use, make sure the roller stays firmly in place and that the tension you worked so hard to build isn’t lost through a loosely placed pin or clip. With the pin methods, it’s best to put the pin in the center of the roller to keep the roller in position.
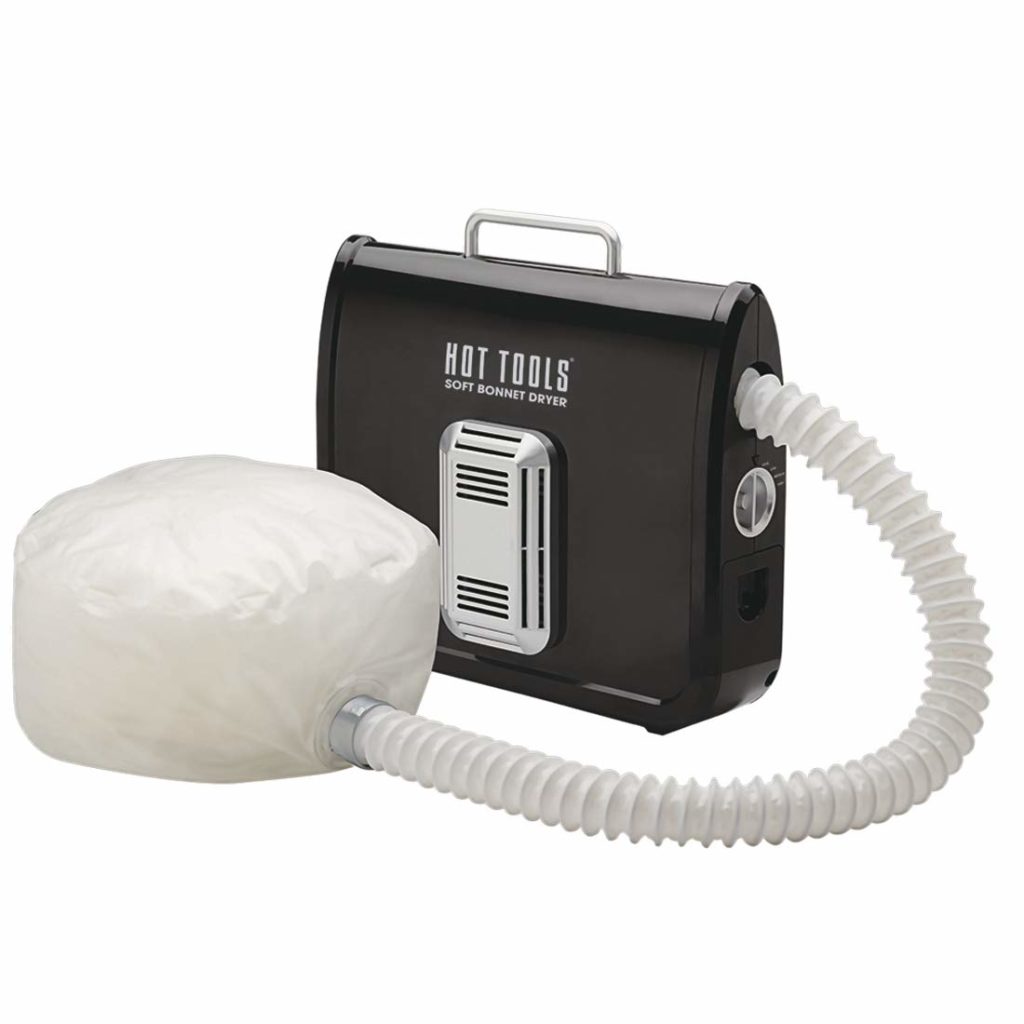
Wig Dryer
When using rollers or other styling methods that use water or water-based products, it’s very important to be able to dry the wig completely. The style will also hold better if you can introduce heat into the drying process.
We use a large cabinet wig dryer when roller setting wigs and beards. But those are a pretty big investment for home wig styling, unfortunately. Here’s a good alternative to speed up drying time and introduce gentle heat. This dryer is efficient, lightweight, and will do a great job drying a single wig or beard at a time. We have one for use during events and it works great. The bonnet is a key component since it allows the hot air to surround the wig.
A quick word about removing the rollers – first, make sure the hair is completely dry. If you can possibly apply hot air for any length of time, it will both speed the drying process and greatly improve the durability of the set. Once you are certain all of the hair is dry, unwrap the rollers one at a time and gently unwind the hair from the roller, rather than pulling the roller out – unwrapping maximizes and preserves the pattern and curl the rollers made.
Curious as to how much of a difference all of these little details make?
On the left (Goofus, if you will), we have sloppy rollers, the hair is wrapped loosely and haphazardly, and some rollers have too much hair. On the right (Gallant, of course), the hair is wrapped neatly and tightly on the rollers, each roller has the right amount of hair on it and the hair is divided fairly evenly among the rollers.

Bad roller technique

Good roller technique
Here’s what happens once they dry and are styled- for both sides, I removed the rollers and gave the hair identical combing and styling.
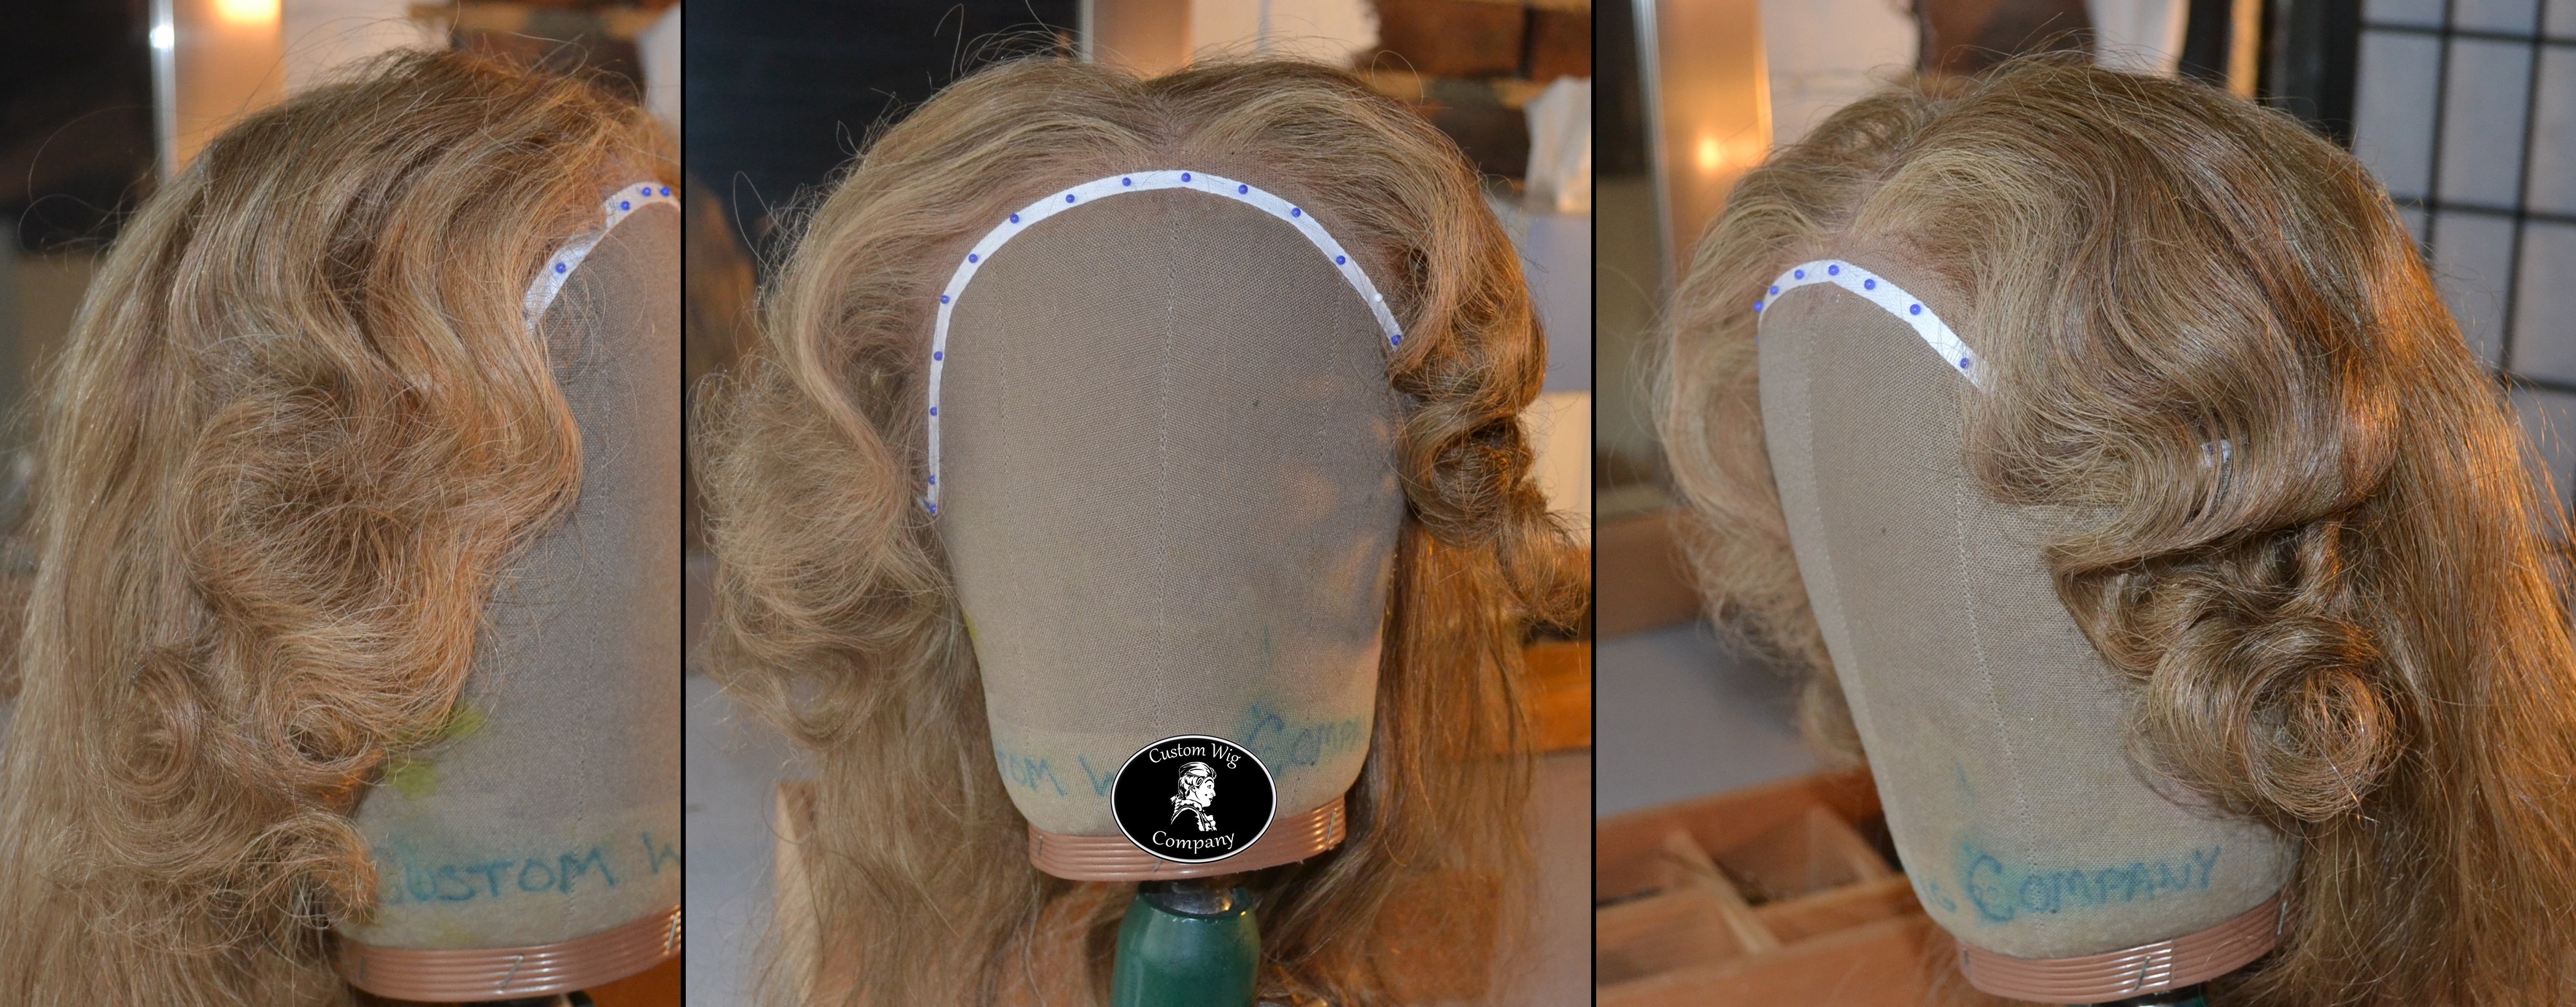
On the left, the wave is less consistent and crisp and the roots are pretty limp and sloppy. The center photo shows how the two sides look in contrast. The right has a much more consistent wave pattern, the execution is less limp and messy and most importantly, the roots have a shape and wave that is almost entirely absent in the Goofus side. That might not seem critical, but if the beginning point of your style isn’t right, the overall execution is going to be much less effective. Imagine trying to do a structured style like finger waves with Goofus – it would be lackluster, at best!
How to style wigs with rollers – what comes next
In Part Three, we put all of this roller technique to use in creating hairstyles. Remember that practice makes perfect and that it pays to work on your roller skills as using rollers correctly will allow you to achieve a wide range of hairstyles – and as a bonus, hair set will rollers is likely to hold up far longer!
A few final tips, notes and trivia on styling wigs with rollers:
- The information about tension, correct sectioning and rolling, and all the rest of this applies to hot rollers, too, and a lot of it even holds true when using a curling iron!
- In general, hair that is naturally curly or wavy will take and hold curl better than straight or fine hair. This is why many women from the 1930’s-1980’s had perms, even though they then set their hair on rollers weekly to achieve their hairstyles. The extra body from those perms made the styling a lot easier.
- Don’t just think of rollers as a styling tool of the 20th century. While rollers are extremely helpful in recreating those styles, their primary function is to “train” hair with wave, curl and also direction. So it can be beneficial to use rollers to help convince your hair that it really does want to part to the left and stay in a bun.
In Part Three, we’ll take the techniques from Parts One and Two and show you how to put it all together.
Essential Wig Styling Supplies
everything you need to style, wear and care for your wigs
[…] Roller (or curlers) are one of the best tools for styling hair or wigs but getting started with them can be a little overwhelming. There are so many sizes and styles, how do you know which ones to use and how to use them? This three part series will explain the physics of rollers so you can use them to style your hair and wigs. Part 2 is here […]
[…] Guide to Rollers, I showed you how the size, direction and density of roller affects hair. Part 2, the Goofus and Gallant edition, showed you some fundamentals of good roller technique – how […]