

One pound of human hair laid out with the wig foundation pieced on the block – the project is ready to begin
We recently completed work on an 18th century lady’s wig for a client. Working from a pair of source images, we were able to create the piece from human hair with a hard-front. A hard-front means that the wig has a defined and semi-rigid hairline rather than the hand-knotted hairline that helps make a wig integrate seamlessly. The goal was to create a piece that closely resembled the type of overt wig a woman might have worn during the 18th century.
Here are some photos of the process:

The wig is built by using strips of hair, called wefts. These strips of hair are made by machine or by hand – we used weft for this project in order to give the wig the massive volume required by the design. Since this project is about creating a wig that looks like a wig, using heavy pieces of weft is both functional and stylistically correct.
The first piece of weft is actually a lighter weight, thinner piece than those used in the rest of the wig. It’s made by hand and it will give the edge of the wig an appearance more like an actual 18th century wig.

The lighter hand-tied weft used on the exposed edges of the wig

Machine made weft
The first piece of weft is sewn along the entire nape, following the direction that the hairstyle will want to go. When working with strips of weft to construct a wig, it’s a good idea to place the strips of weft in such a way that they will go easily into the desired style. So if you know the hairstyle sweeps back from the face, sew the weft around the face with the hair pointing back and the edge of the weft at the front. You can also position more pieces of weft in an area where you want more volume or a fuller appearance.
The bottom piece of weft pinned into place for sewing

More pieces of weft have been sewn to the cap

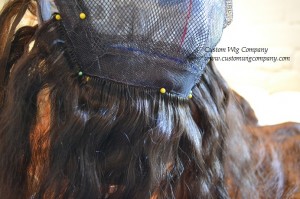
Weft sewn on the back – the front piece of hand-tied weft is also pinned into place in order to serve as a guide for the placement and direction of the wefts on the crown of the wig
After the first piece of weft is sewn along the nape, more pieces of weft are carefully placed on the foundation and sewn into place by hand.
The pieces of weft are placed close together because the wig needs a lot of hair to achieve proper 18th century volume. In the back of the wig, the pieces are put on from left to right in a straight line but on the crown of the wig, the placement begins to change so that the fullness of the weft better supports the finished hairstyle
Once all of the weft has been sewn on, it is carefully brushed out and then given a trim to ensure the shape is even. We used an even mix of straight and wavy hair textures to give the extra volume and help it maintain it’s style. Even if the desired texture of a wig’s hair is smooth, we often use a hair with at least a little wave in it to help it hold the style. This wig has almost twice as much hair as we would use in a wig intended to look like someone’s “real” hair!

Finished wig in profile

The front edge of the finished wig
Even though this wig has a hard-front, we also attached a small piece of wig lace to the front. By doing this, the wearer has an extra attachment point and can glue the lace edge down to help hold the wig in place. It also ensures that the carefully shaped hairline stays in the proper spot on the wearer. Additionally, adding the lace edge ensures that there won’t be any “peeking” under the wig edge and that the wig won’t ride back on the head.
After combing and cutting, we put the wig into rollers and styled it. We used large rollers in order to achieve the height at the root as well as the gentle wave throughout. To set human hair, we use a mix of equal parts isopropyl alcohol water and gel. We spray it on as we work through the hair rather than attempting to saturate the entire head of hair at once. Below is the result


Back view

Thanks for reading! Based on our experience creating this wig, we’ve started working on some exciting new projects for the 18th century, which we’ll be announcing very soon. Be sure to join our mailing list if you want to hear about them first!
I really enjoy your Face Book site…I have been a wig stylist for 40 years as well as a hairdresser…At that time there was no where to learn ,so every thing was finding books and talking to people. Now my son and his wife are involved and really like the work…Thank you so much for sharing…Sandra
Thanks, Sandra! I think it’s great how much easier the internet makes sharing stories, experience and information – we’re happy to be able to add our two cents now and then.